Stereo (3-D) Photography
An Example You Can View

I
Stereo Left Stereo Right
I


INSTRUCTIONS
To view this stereo photo pair in 3-D you must be able to see about equally well with either eye and be able to 'cross' your eyes slightly. (They won't lock that way in spite of moma's warnings. I've been crossing my eyes for more than 50 years and still have excellent vision!) If you have difficulty crossing your eyes, try to follow these directions. It will help if the images are near eye-level and there are no distracting reflections on the screen:
If you are successful, you will get something like the images below and the center square will be in 3-D. (This example will not be in 3-D unless you are still crossing your eyes.) If you see a good match of the image square, but the objects don't line up well, you may need to tilt you head very slightly to one side or the other to get the image to register perfectly.
                                  I                         I
Stereo Left Stereo Left Stereo Right
                                  I                         I

Click here to see another "cross-eye" stereo pair.
Here is a 3-D graphic. The 3-D effect is so exagerated that it may be a little difficult to see clearly. It is better viewed from a greater distance.


A Stereo Graphic
If this has aroused your curiosity about stereo photography, look at the links I have placed here. If you were unable to see the 3-D view try the other two pairs that have now been added or try the first link listed. It has a set of graphic 3-D images that may help you practice.

Now I've decided to provide the stereo pair with a reverse image to be viewed with a mirror. (I explain later about the mirror technique.) I tried this and was actually surprised by the ease of viewing! I used a ladies handheld mirror that had a long horizontal oval shape. The narrow end of the oval fit right against the bridge of my glasses (just to the left of the bridge) and I viewed the screen from a normal viewing distance. The plane of the mirror will be pointing toward the space between the images and you should be in front of image on the right. It was surprisingly easy to adjust the mirror to get the images to overlap and the 3-D effect was great! However, since the mirror didn't reach all the way to the screen, a little bit of left of the image was not reflected. I also noticed some glare around the little ballerina that seems to be from the front surface reflection.


Stereo Left............... Stereo Right


Now I have swapped the images left for right so that they can be viewed in 3-D by the 'straight' view technique. From a viewing position not too close to the screen, try to have a distant (blank) stare in which you are looking far beyond the screen. You should see the images overlap and produce a 3-D image in the center. This is similar to viewing those odd graphic pictures that have a hidden 3-D in them. I find this technique VERY difficult, but others seem to have no problem using it. It is easier for beginners when the images are smaller. I may try that.


I
Stereo Left Stereo Right
I


I
Stereo Left Stereo Right
I


I was able to view these pretty easily and the 3-D effect is dramatic.


THE PHOTO TECHNIQUE (Stereo photo pairs using two separate exposures)
The photo pair was made with a 35mm SLR camera mounted on a tripod with a special tripod mounting bracket for stereo photography. A friend at work had given me the homemade bracket. It allowed the camera to be moved horizontally in a controlled manner between shoots. Stereo pairs can be made handheld if care is exercised and if cropping of the resulting photos can be done, but this bracket made it much easier. A tripod-mounted flash was located above and to the right of the camera. The light source should not be moved between shots. I made this pair to try the bracket and to have a nice color stereo pair for the antique stereoscope I got for Christmas one year. I scanned these images and moved the 'right eye' image to the left for 'cross-eyed' viewing. With cross-eyed viewing the right eye, of course, is looking across at the image on the left and the left eye is looking to the right.

MY EXPERIENCE WITH OTHER STEREO PHOTO SYSTEMS
I was completely fascinated with the ViewMaster my sister and I received from our Uncle and Aunt. I really enjoyed the reel that showed the story of Christmas. The pictures showed little doll characters depicting Mary and Joseph, the animals, and all the others in the story. They were photographed on miniature tabletop scenes. In my teen years my Uncle gave me his old 626 roll film stereo camera with a stereo slide viewer. I used some color and some B&W transparency film in it. The pairs were cut from the film and slipped into cardboard slide holders for viewing in the viewer. In the late 1950s, Life magazine had an article on 3-D images and a stereo pair was printed for viewing with the aid of a mirror. One of the pair was printed as a mirror image and by placing the edge of a small mirror along the line between the images it was easy for one eye to view one image in the mirror while the other eye viewed the other image directly. This made it easy to overlap the images and see the 3-D effect. Many years later I built a viewer for 5x7 inch prints using the reversed image/mirror technique. A 'front-surface' mirror works much better for this than regular mirrors because a regular mirror produce a faint reflection from its front surface and when looked at from an angel the front-surface reflection is offset from the mirrored surface reflection and is a distracting fringe image. My uncle also had a mirror attachment for a camera lens and a matching slide viewer for exposing a stereo pair on one 35mm frame. The attachment was sort of like a double periscope. One view was displaced a little to the left and one to the right. Mirrors reflected the images toward the center and into the lens. The slide viewer did the reverse. It used mirrors to separate the images so that they could be viewed at the normal inter-ocular distance.


LINKS
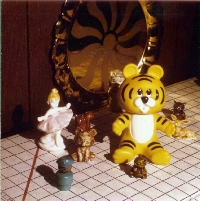
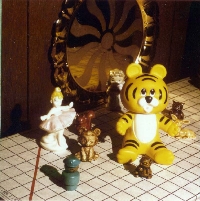
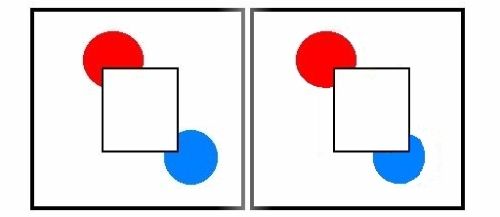
Stereo Photography This site has stereo pairs displayed at three different sizes and for both 'cross-eyed' and straight viewing. There are test images (cicles in a square) for practice and selection of the best size and viewing technique. After determinig the best view, click the label to view the set at that size and view.

Stereo Photography This site seems to have the best stereo pairs for 'cross-eyed' viewing. The selection is very good also.

3-D Photography This site is the most comprehensive site that I found during my search.

Stereo Photography Page This site has a humorous take on stereo photography. Great writing! And I finally noticed the 'animated gif' 3-D image at the top of the page, but it doesn't have a 3-D look to me.

Torrey Nelson's Stereo Photography Page This site has stereo pairs that seem to have been made by the mirror attachment I mentioned in my text. The results are pretty good, but having the 'side' images so close is a little distracting.

Slidebar Stereo Photography This site displays some great stereo pairs for cross-eyed viewing. (Since I've looked more closely, I think some are displayed for straight viewing.) The slidebar is what I used for the pair on my page. You should be good at cross-eyed viewing before trying these, because they are displayed at full screen width.


Pinhole Photography - An old pinhole photograph is compared to a modern 35mm photo of the re-created scene with an explanation of the process for making a large-format pinhole photograph using photo enlarging paper.

Photographic Perspective - Our experience with photography gives us the impression that the focal length of the lens will create a particular perspective in the resulting photograph. However, the photos shown here illustrate that it is camera-to-subject distance, not lens focal length that makes the difference.

Stereo Photography - A stereo photo pair is displayed with instruction for viewing in 3-D by the "cross-eyed" technique. There is also a brief account of my experience with stereo photo systems and links to several excellent and comprehensive sites on stereo photography.

Film Resolution - A portrait of a young woman and enlargements of her eyes demonstrate the degree of resolution I was able to obtain with B&W 35mm film.

Bridal Portrait - A portrait of a young bride and enlargements of her eyes demonstrate the degree of resolution achieved with 35mm colorprint film.


SITE INDEX

VIEW OR SIGN MY GUESTBOOK

1/10/02